SnapStruct – SnapPanels Guide (User Manual)
SnapPanels Introduction
SnapStruct offers state-of-the-art modular, versatile, and adaptable panels, known as SnapPanels. These innovative solutions include SnapWall, SnapCorner, SnapWindow, and SnapDoor panels, designed to meet a variety of construction and design needs. Below, we present key features and essential information about our SnapPanels.
- SnapWall Panels are crafted using premium-grade 2×4 and 2×6 lumber, ensuring exceptional durability and reliability.
- These panels are designed to achieve precise standard ceiling heights and standard framing spacing (16 O.C), including:
– 8 ft ceiling (97 1/8″)
– 9 ft ceiling (109 1/8″)
– 10 ft ceiling (113 1/8″)
This precision allows for seamless integration with standard drywall and other material panel sizes, ensuring convenience for next steps . - Exterior SnapPanels are equipped with 7/16″ OSB sheathing (If you require another OSB thickness, please contact us), surpassing basic building code requirements. They also feature a high-quality weather wrap for enhanced durability and protection against the elements.
- SnapWall and SnapCorner Panels are directionless, offering exceptional flexibility in their application. However, SnapDoor and SnapWindow Panels are directional by design and obviously cannot be flipped upside down 😊.
- SnapPanels are not only modular but flexible as well and can be cut with Ease to complete walls of any length.
- A consistent 0.9 inch overhang of OSB at the top and bottom is designed to facilitate fastening SnapPanels to sole plates, cap plates, rim joist boards, and other structural components.
- Our panels are crafted with unmatched precision and consistency, key features include:
- Engineered Consistent Heights: Ensuring accuracy across all panels.
- Precise Spacing: Delivering uniformity and ease of installation.
- Weather Barrier Wrap: Professionally applied for reliable protection.
- Standard 1/8″ OSB sheathing expansion gaps; preventing buckling or warping.
- Perfect Sheathing Nailing Pattern: Both Edge Spacing (ES) and field Spacing (FS) nails are precisely placed, with near-zero shiners.
- SnapPanels are engineered to meet and exceed building codes, even in the most extreme climate conditions. They incorporate the following robust features:
- Thicker Sheathing: Adding additional strength and resilience.
- Longest Sheathing Nails: Ensuring maximum stability and durability.
- Double Studs at Panel Joints: Acting as strong pillars to enhance structural integrity.
- Dual Footer Plates (Bottom and Sole) and Dual Top Plates (Top and Cap): Providing superior resistance against hurricanes and floods. They also provide double-link or stitching reinforcement at the corners, both at the top and bottom, as detailed in the SnapCorner Panel guide —an improvement over the single top-link approach used in traditional building methods.
- These strength-enhancing features make SnapStruct constructions significantly stronger and more disaster-resistant than traditional builds, delivering a robust framework, giving SnapStruct constructions a much higher likelihood of surviving harsh conditions compared to traditional structures.
Steps for all SnapPanels
Step 1 – Placing SnapPanels on Sole Plates
- First of all, you need to plan your build dimensions and layout.
- Choose a corner of your building to start from.
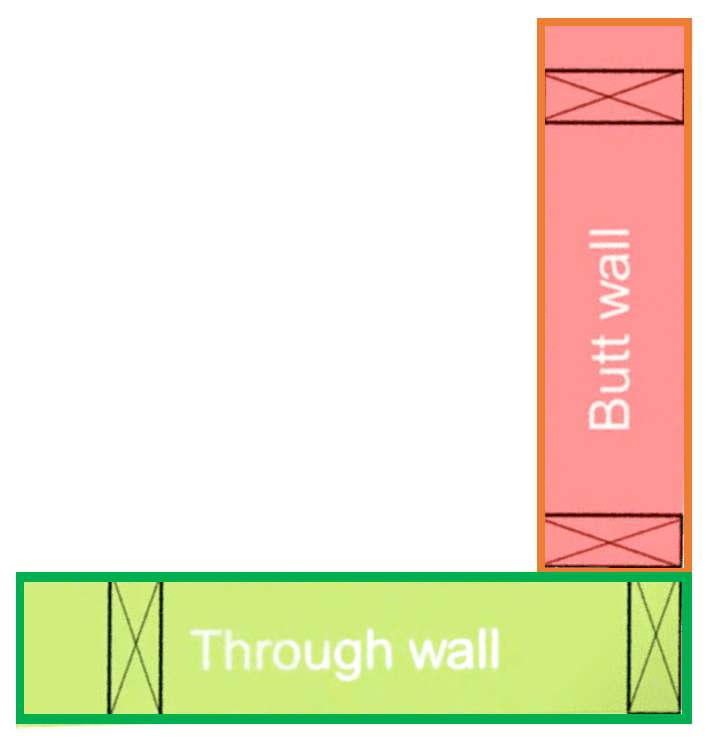
- As a rule of thumb, the long wall is the through wall, and the shorter, intersecting wall is the butt-wall. The SnapCorner Panel is installed at the beginning and end of the Butt-wall and can be connected to any SnapPanel or custom framing in the through-wall. Decide which will be Butt-wall (typically shorter wall) and which Wall will be Through-wall (typically longer wall).
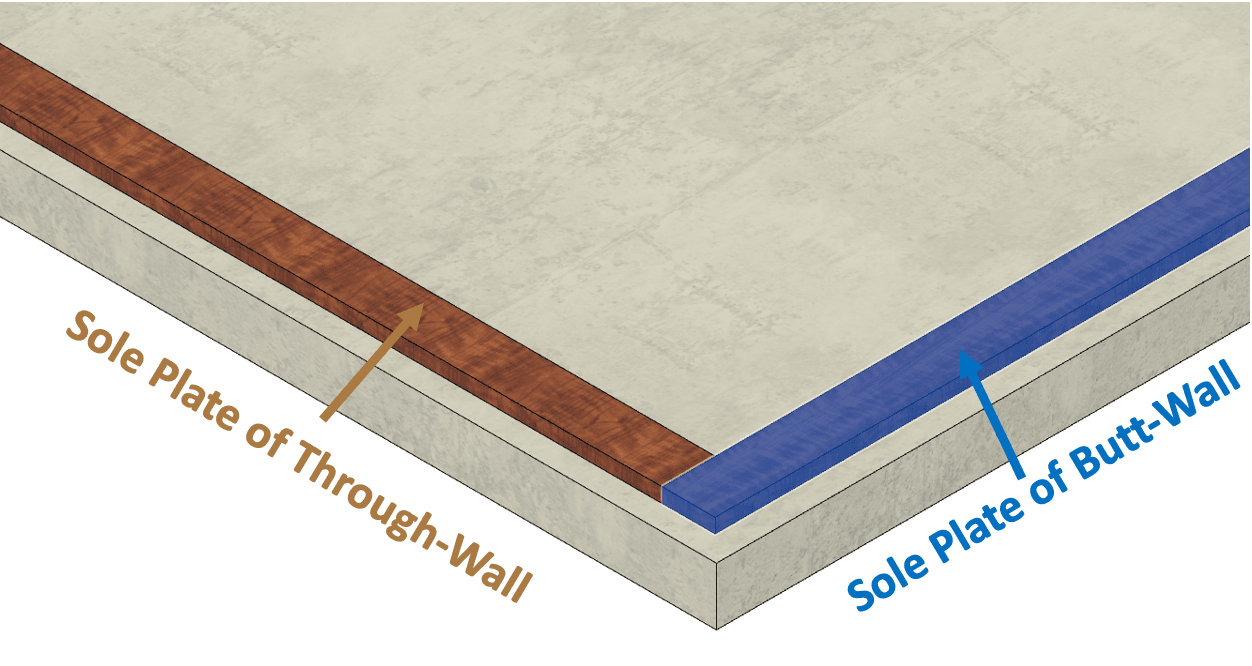
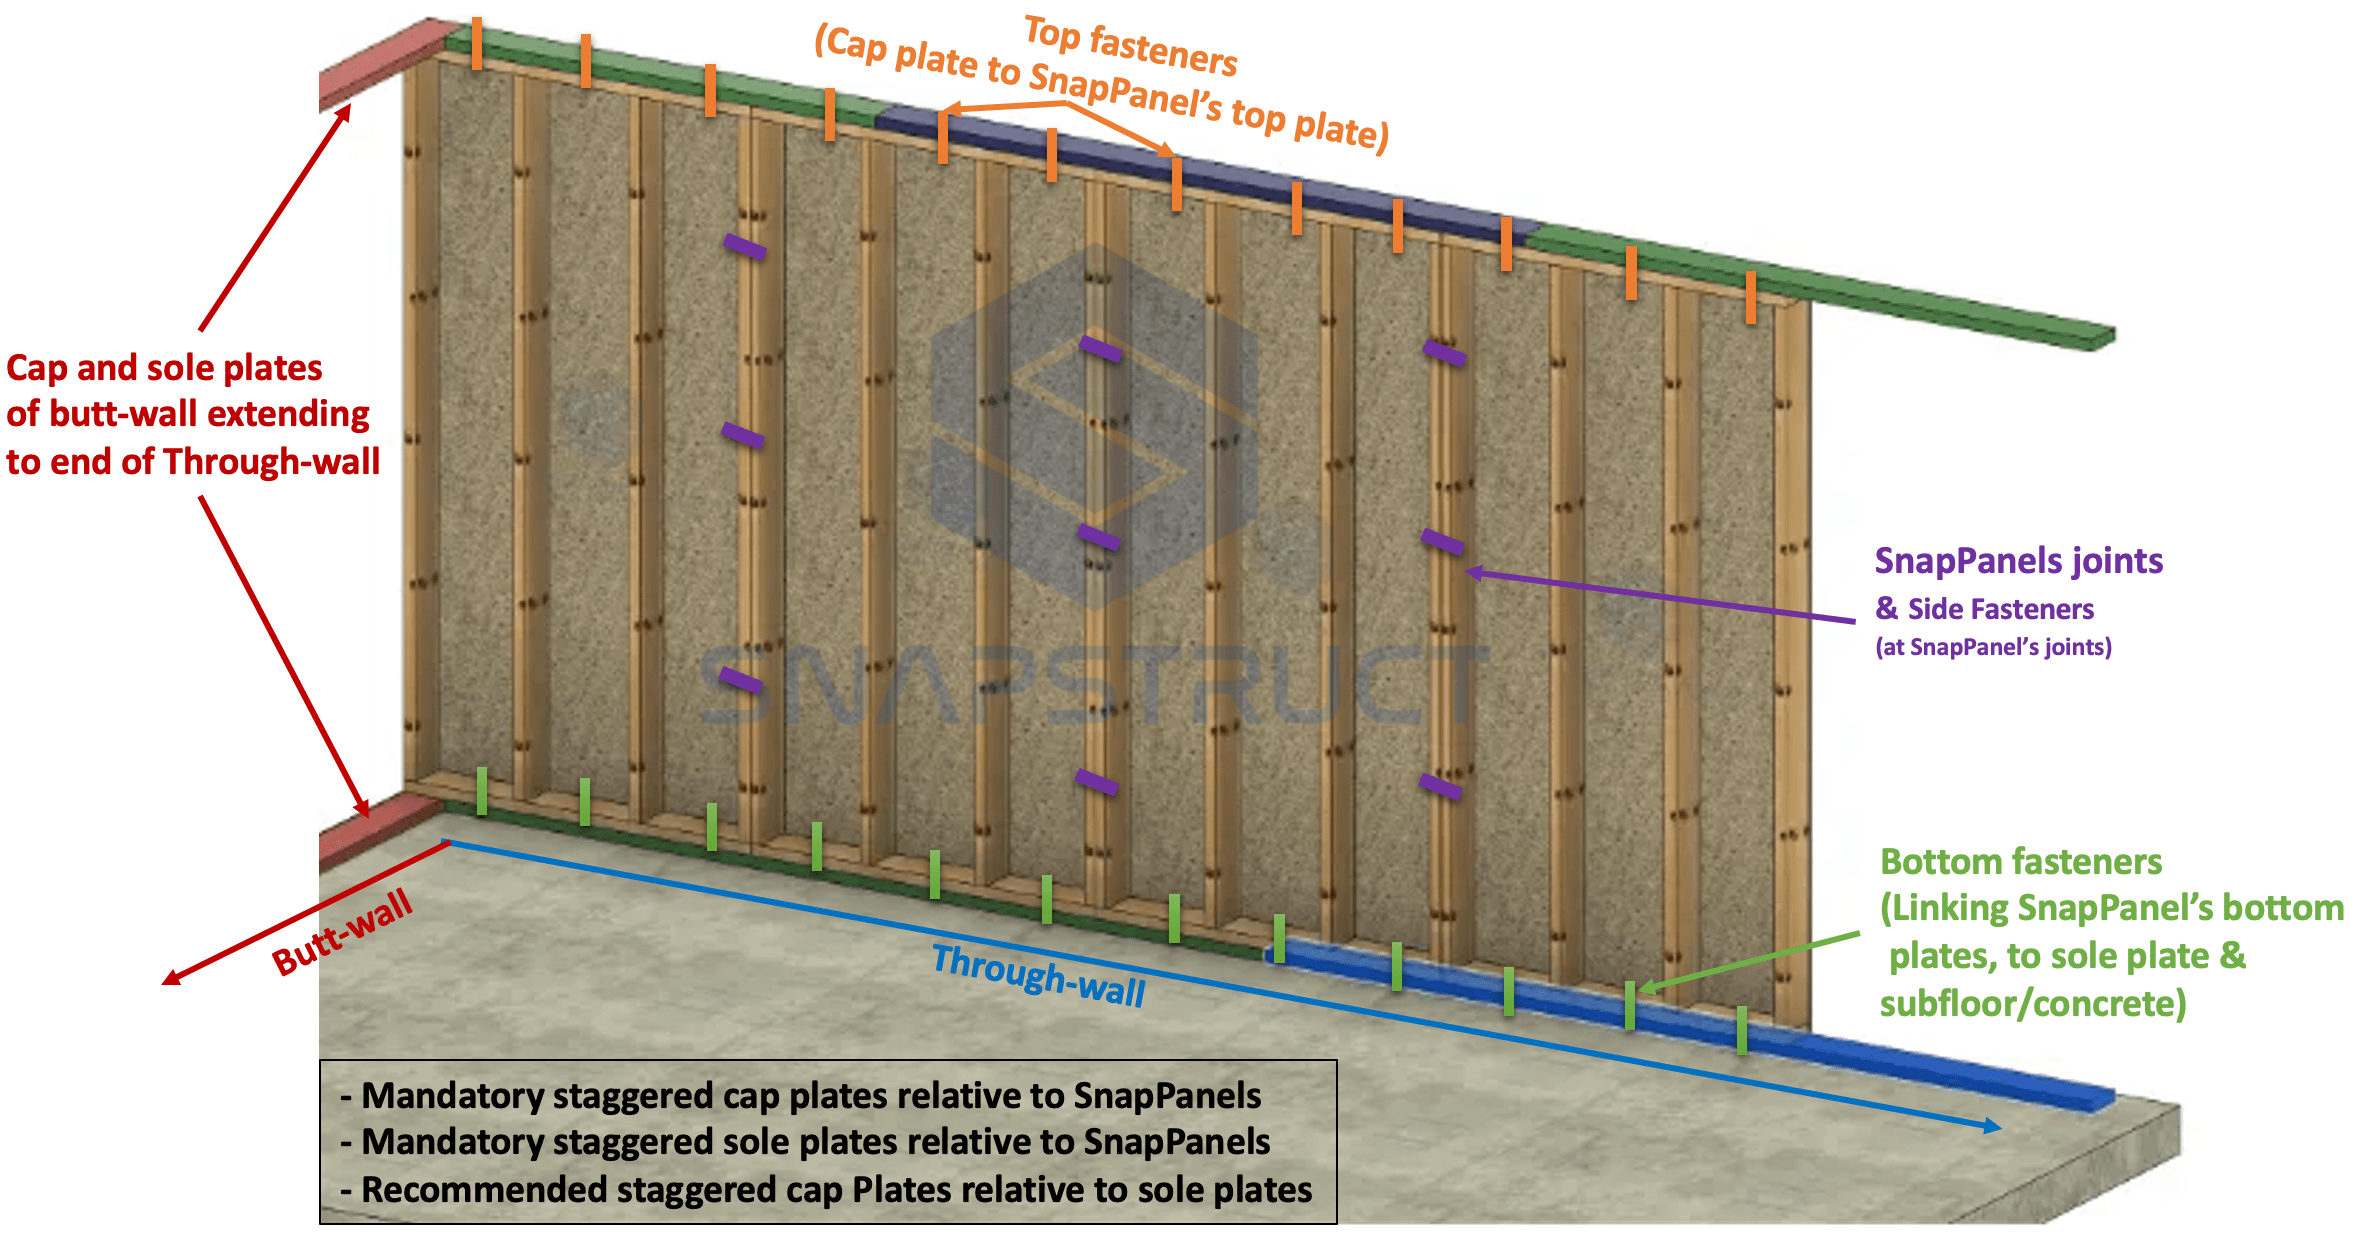
- Fasten the sole plates appropriately: Sole plate of Butt-wall extends all the way to the end of the depth of the Through-wall as shown: (Note: The same rules apply to the cap plates.)
- Choose the first SnapPanel to use:
- If your are starting from the corner of the Butt-wall, then use a SnapCorner Panel first.
- If your are starting from the corner of the Through-wall, then use a SnapWall, SnapDoor, or SnapWindow Panels as per your layout.
- Place the selected SnapPanel in its place on the sole plate and nail together.
- Note: If the panels are for first floor level and are attached to a concrete slap, it is recommended to make the concrete anchor tighten both the bottom plate and sole plate to the concrete slap as shown. The double bottom plates (Bottom and Sole) used in the SnapStruct SnapPanels system provide significantly enhanced structural integrity; offering superior storms, hurricanes and flood resistance. ( In such harsh natural conditions, usually the single sole plate in traditional buildings fails, causing houses to float, tilt, or suffer partial or complete destruction.)
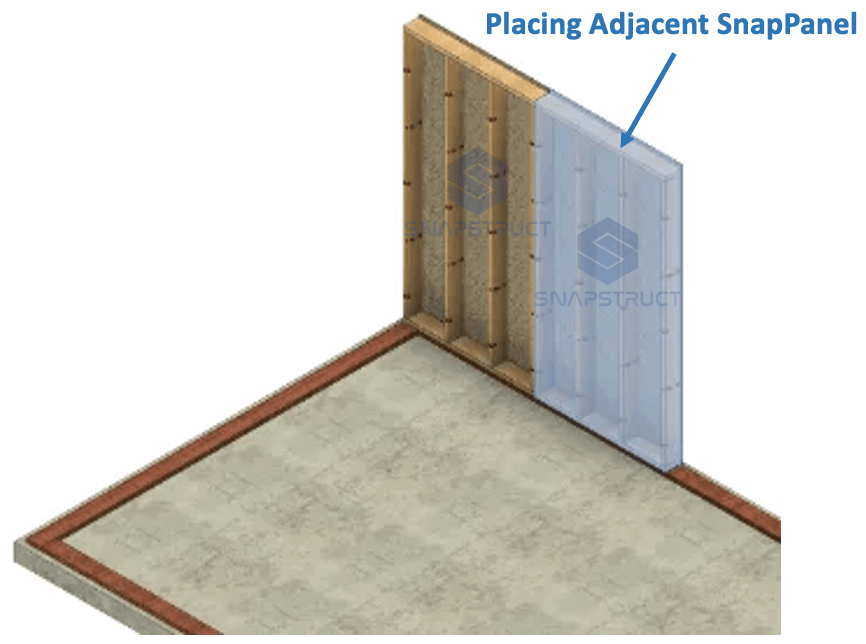
- In this example, we started by a SnapWall in the Through-Wall Corner, as shown in following picture:
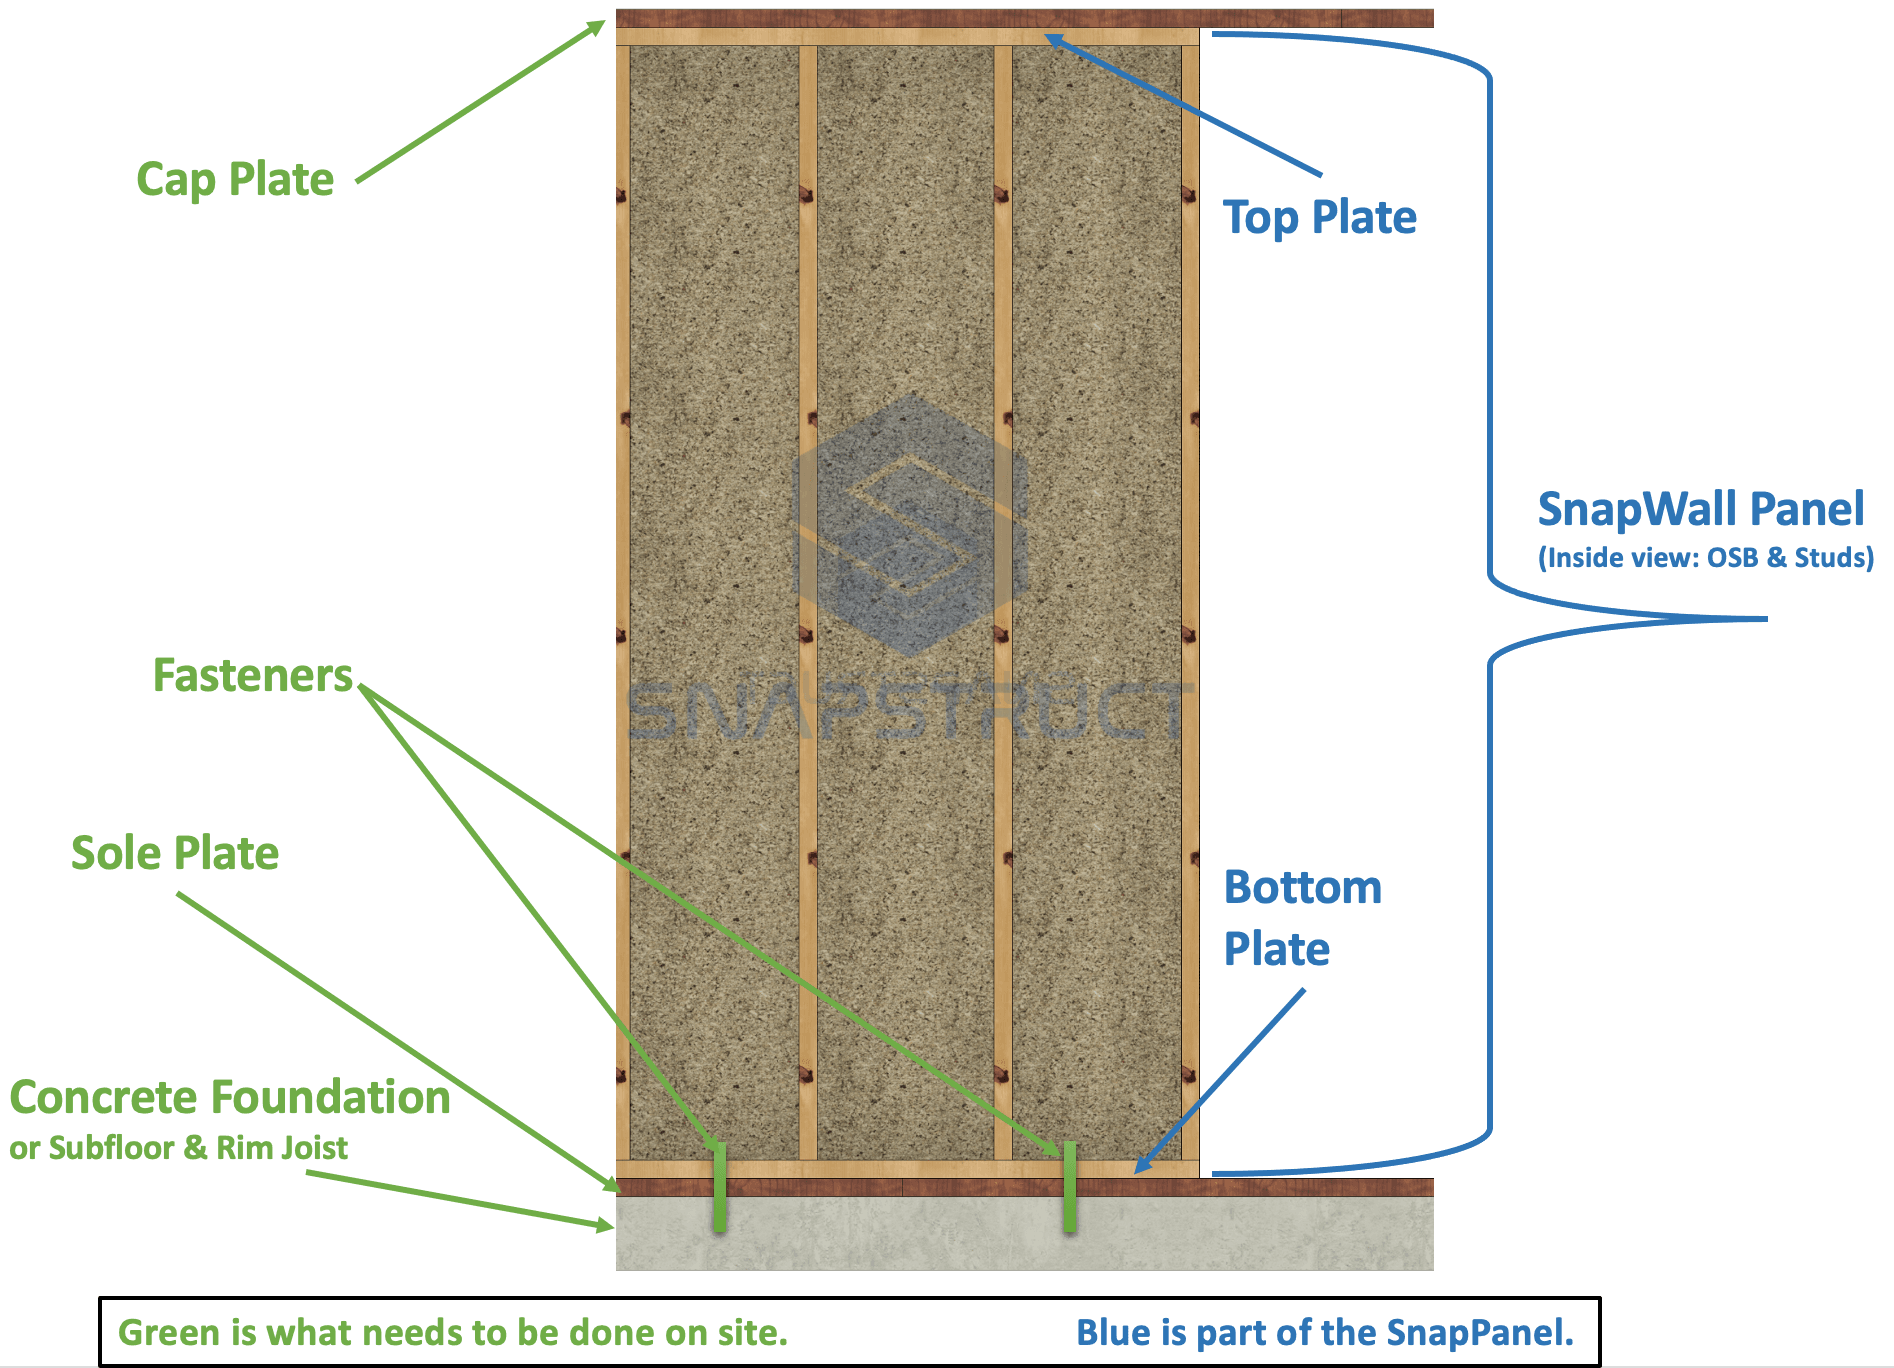
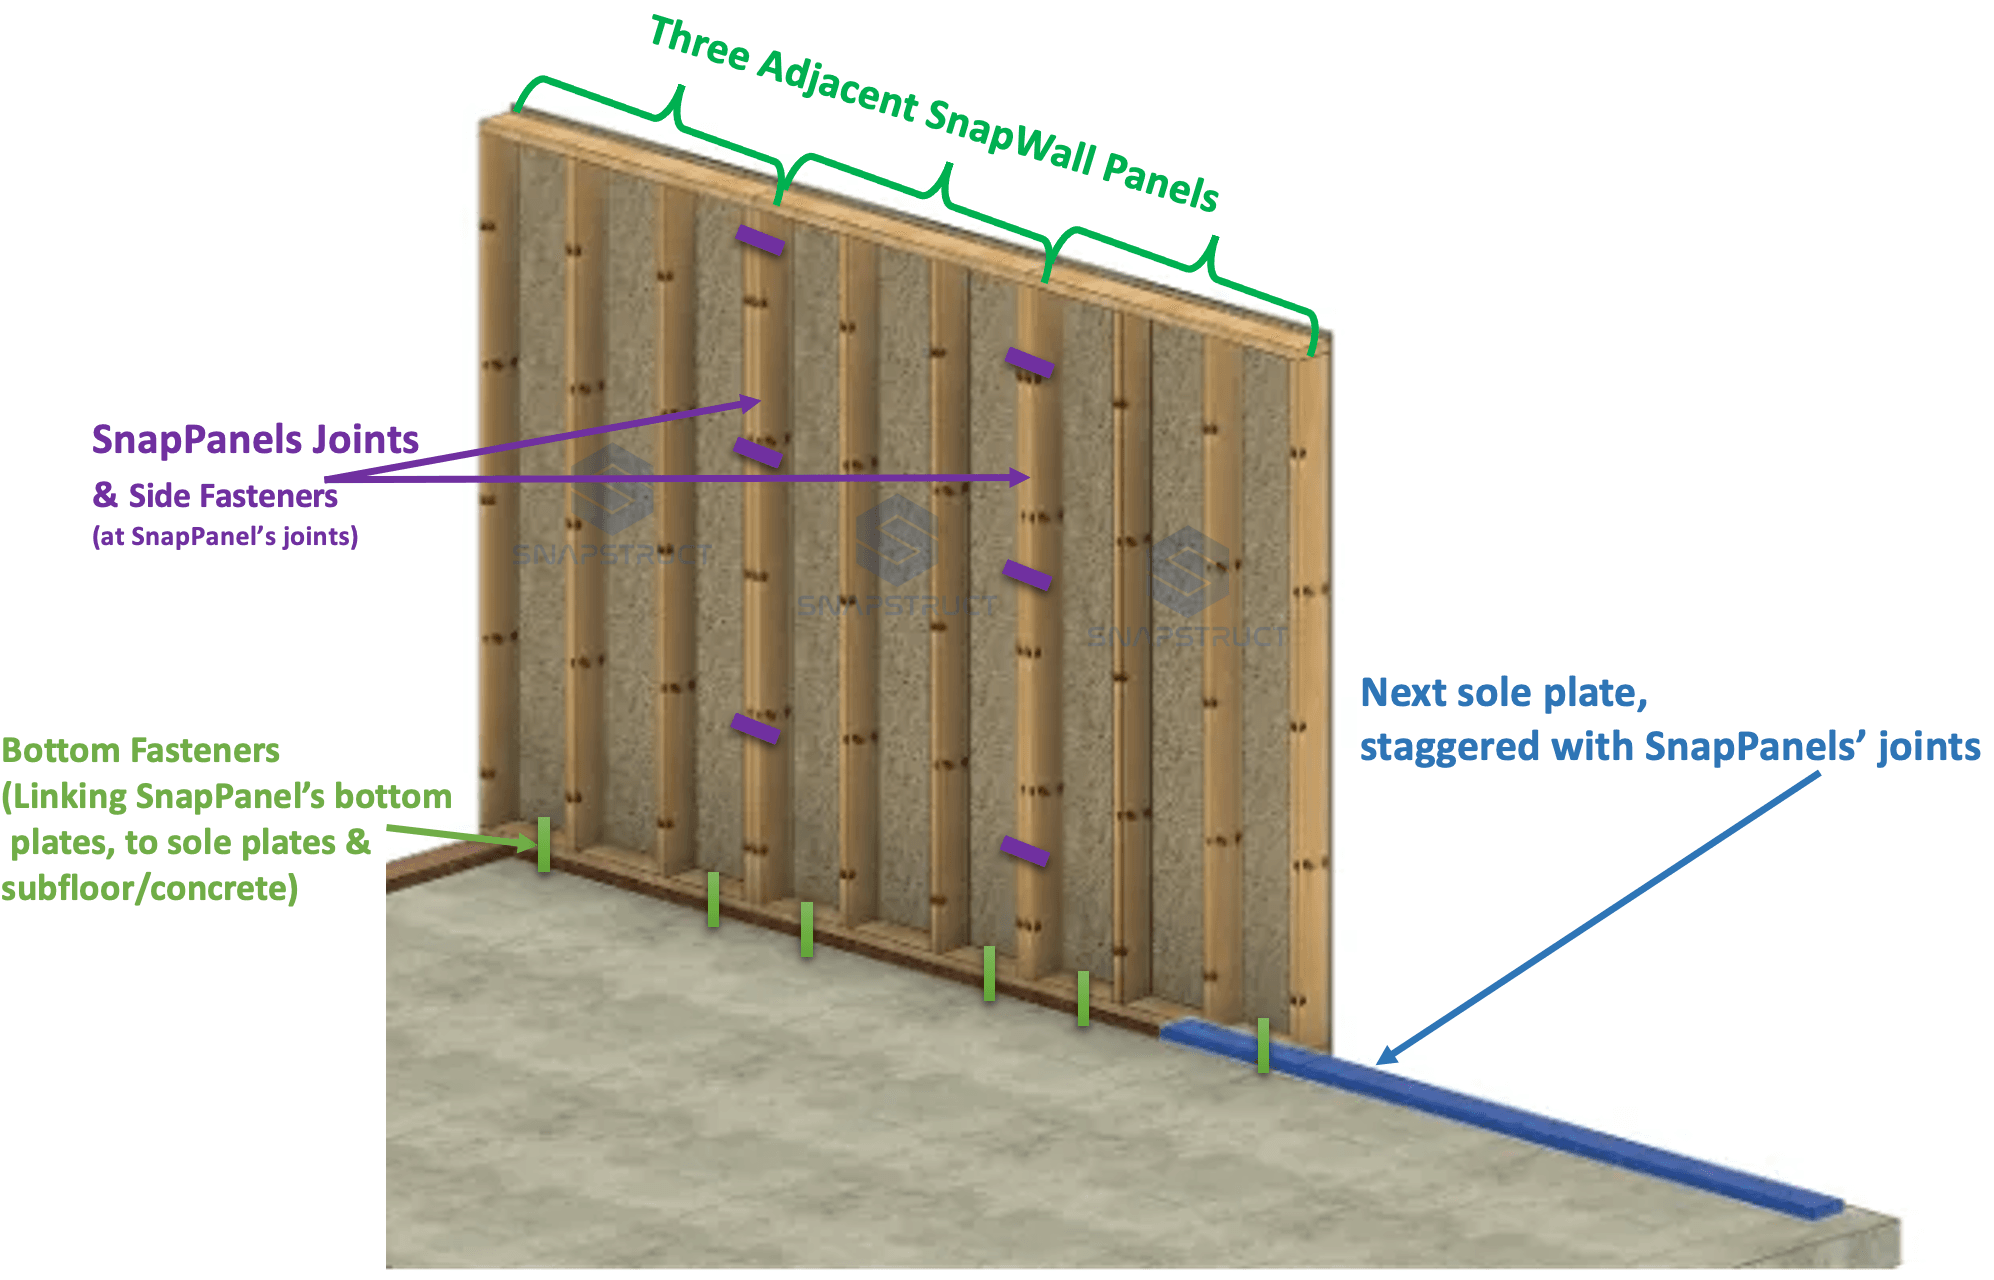
- It is imperative for the structural integrity of the wall that the sole plates are staggered with panel’s bottom plates. Meaning they don’t end in the same line as shown.
- Place the adjacent SnapPanel and fasten as follows:
– At the bottom: fasten to the sole plate as well as concrete or Subfloor (nails, screws, concrete anchors or bolts)
– At the sides: fasten to the adjacent SnapWall Panels (nails, screws or bolts).
Step 2 – Placing Cap Plates on top of SnapPanels
- Once the wall is assembled and all SnapPanels are fastened together and fastened to sole plate and concrete/subfloor properly, it is time to install the cap plates.
- Similar to sole plates, to ensure structural integrity, stagger the cap plate joints as follows:
- The cap plate joints must be staggered relative to the SnapPanel top plate joints.
- It is also recommended to stagger the cap plate joints relative to the sole plate joints for added strength.
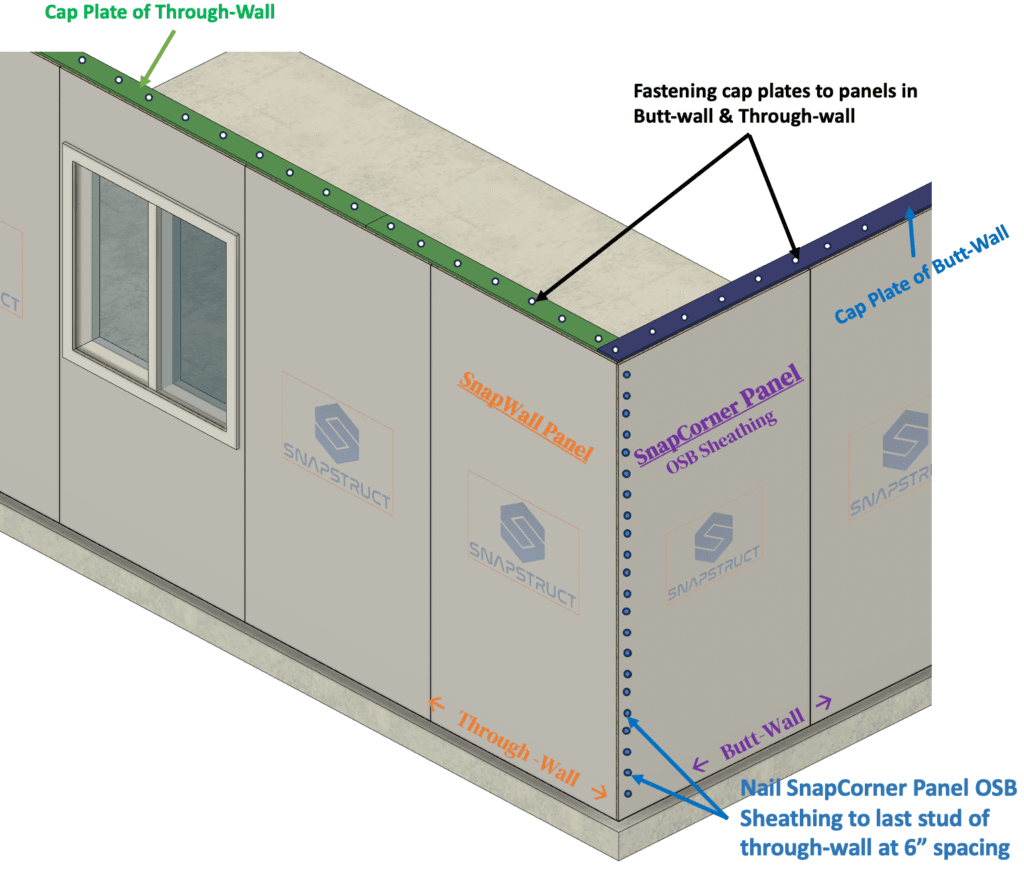
- For Corners, Fasten the Cap plates appropriately: Cap plate of Butt-wall extends all the way to the end of the depth of the Through-wall
Step 3 – Nail sheathing to sole and cap plates (Recommended)
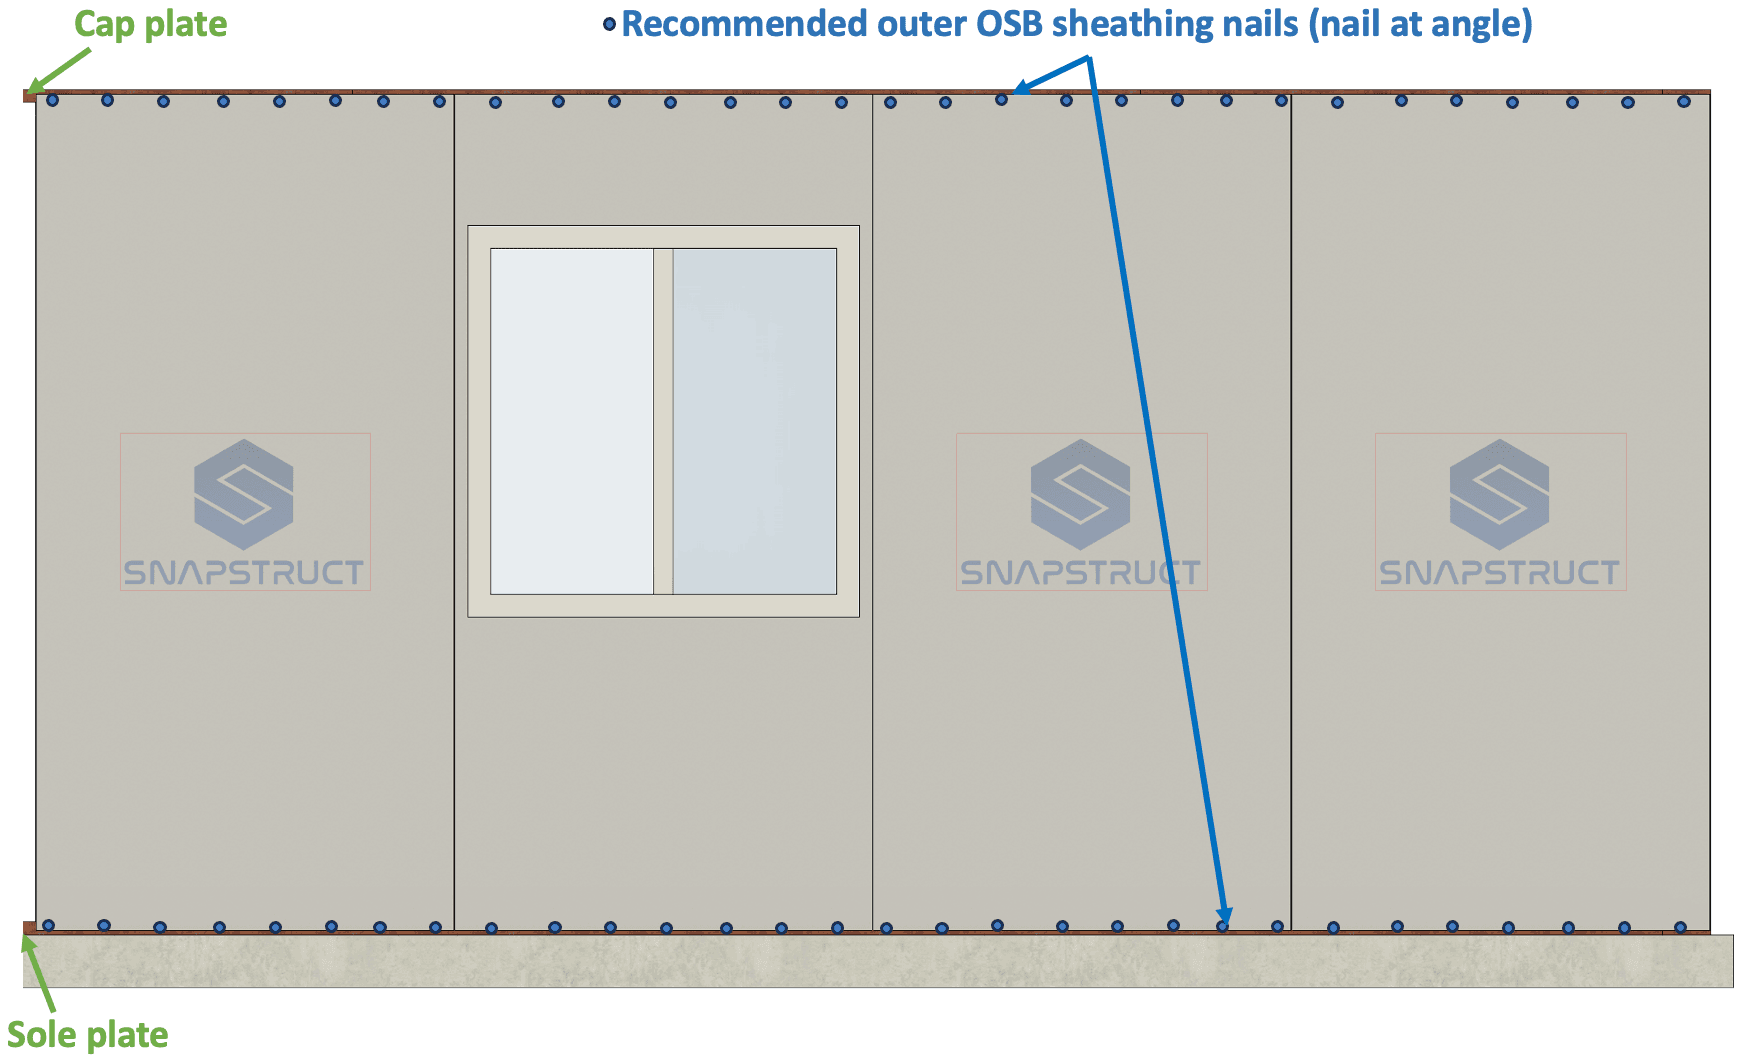
- It is recommended to nail the OSB sheathing overhang sections of the SnapPanels to the sole and cap plates, as this enhances the structural integrity, making the build a unified piece. (note: nail at angle as the OSB overhang part is around 0.93″)
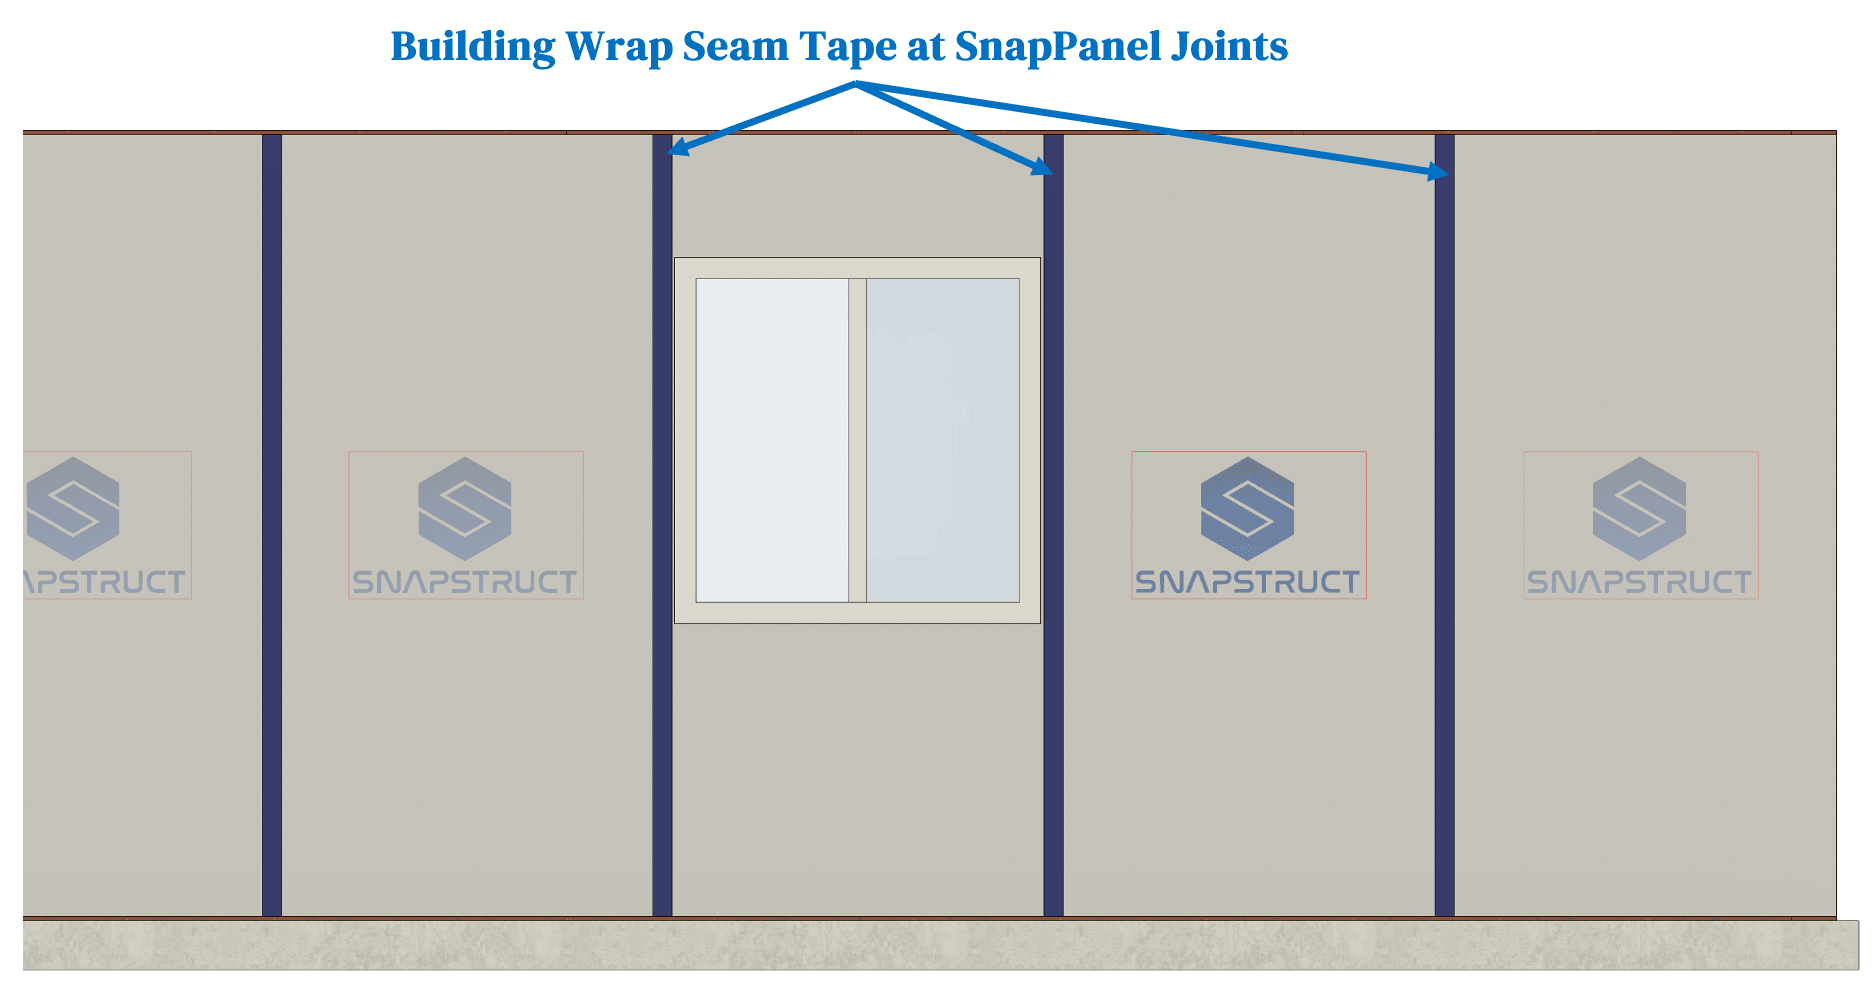
Step 4 – Seam Flashing / Taping:
- To properly use seam tape at SnapPanels joints, ensure the tape meets your local building code requirements, typically calling for a minimum width of 3 inches to provide adequate coverage. Begin by cleaning and drying the surfaces for a secure bond. Align the tape over the seam, centering it evenly. Press firmly along the tape to ensure full adhesion, and smooth out any wrinkles to maintain a continuous, airtight seal. Similar seam tape is applied to the horizontal seams in multi-story buildings.
Step 5 – Flexibility With Cutting SnapPanels
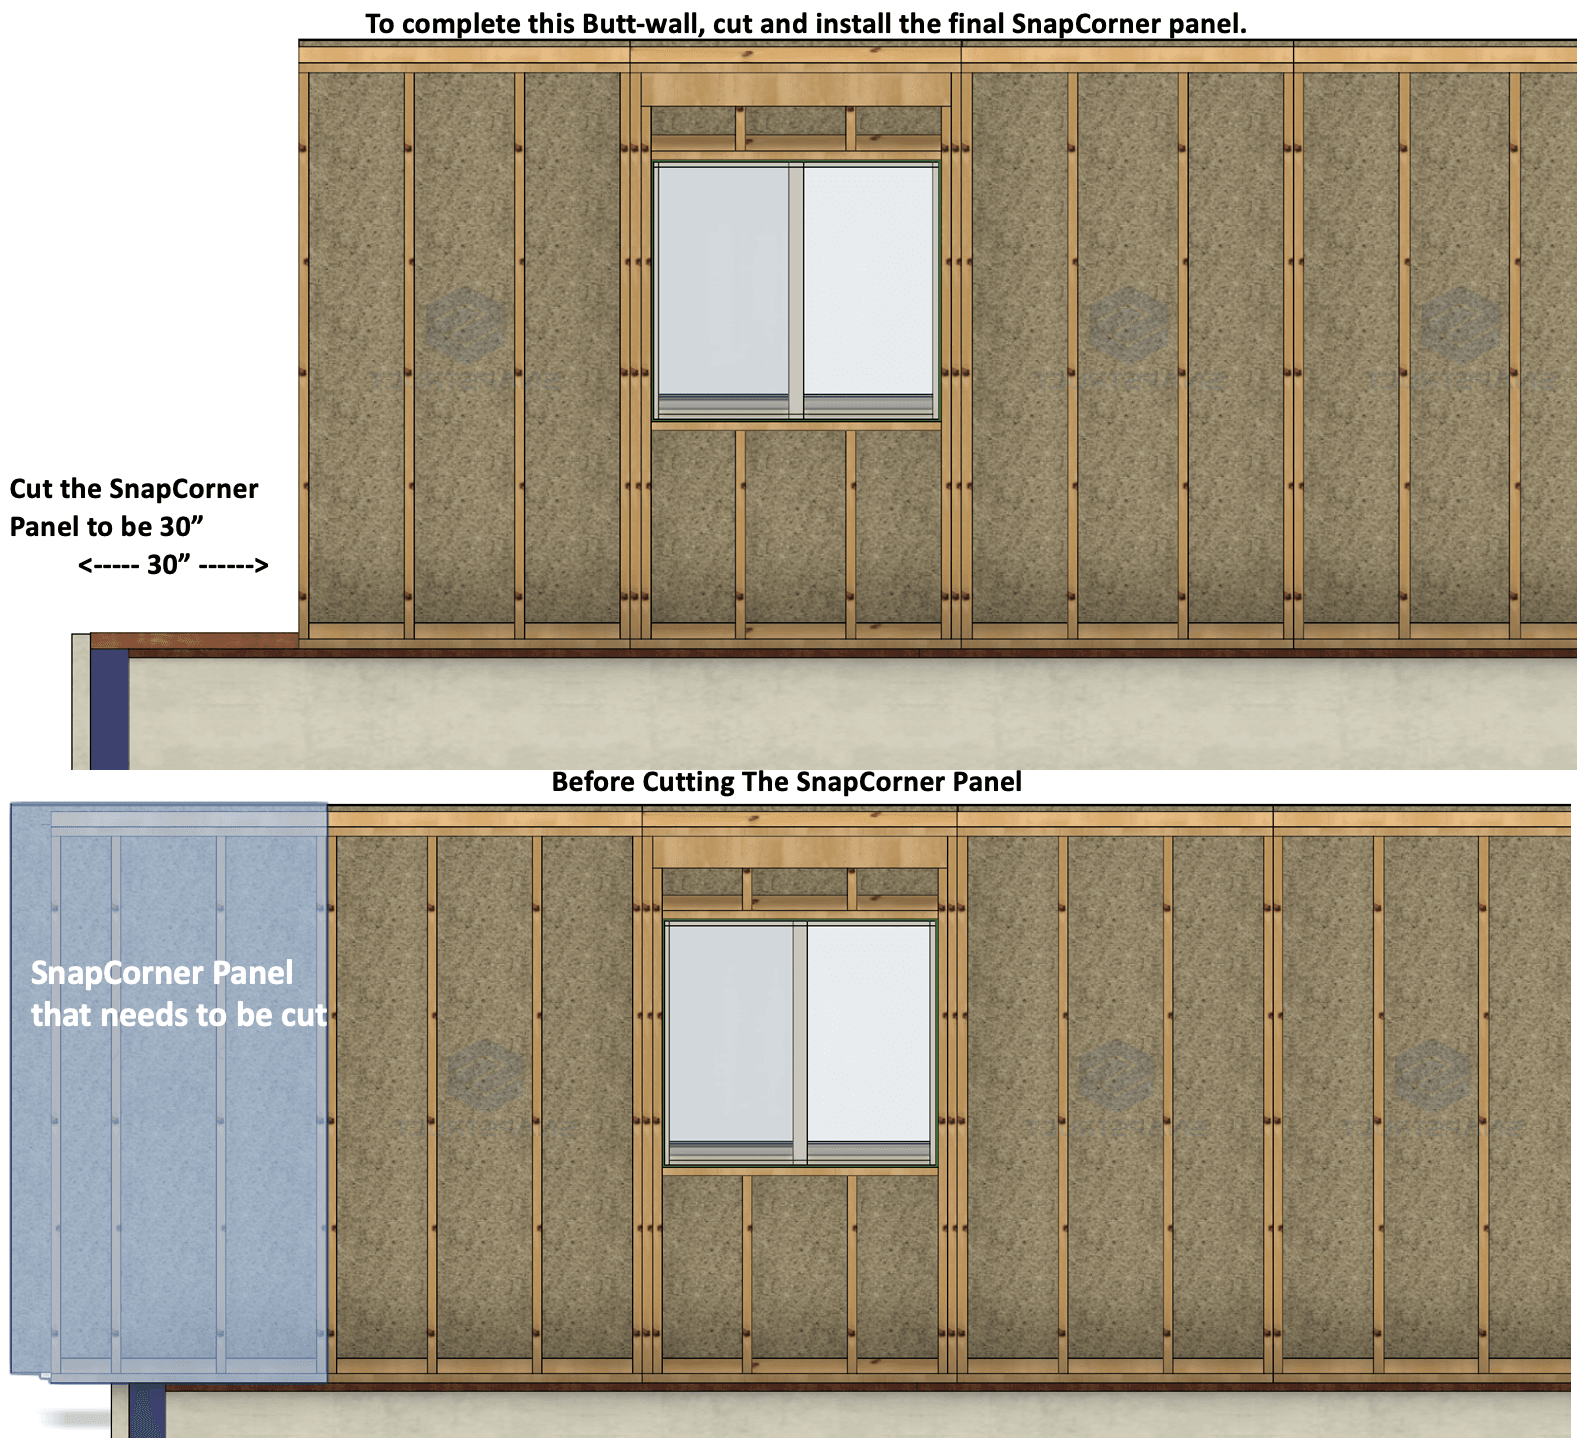
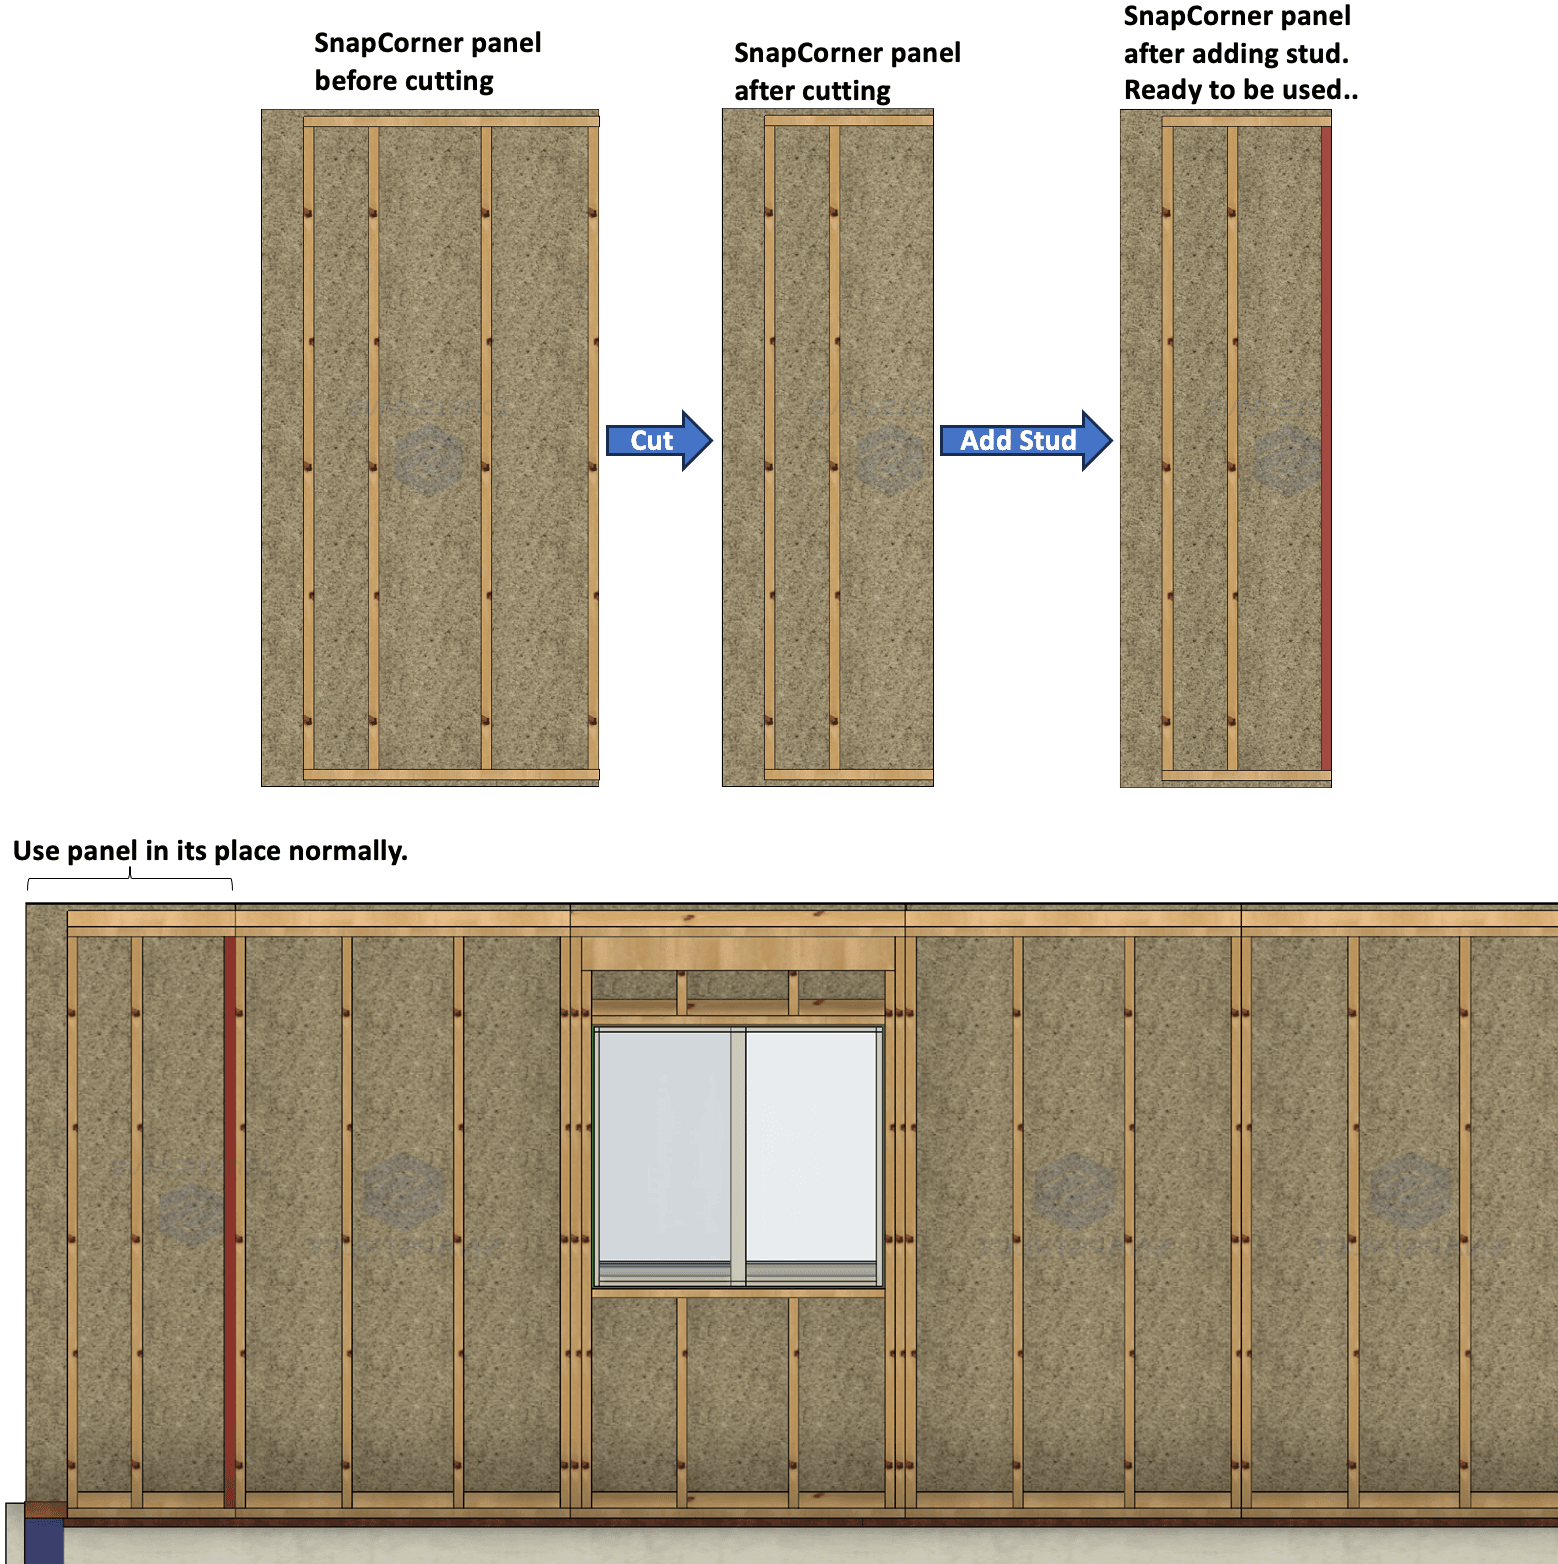
SnapStruct panels are not only modular but also highly flexible and can be easily cut to fit various design needs. Think of them somewhat like drywall, OSB, or any construction panel, if you need a smaller section to complete a wall, simply cut the SnapPanel to the desired size (cutting example 1).
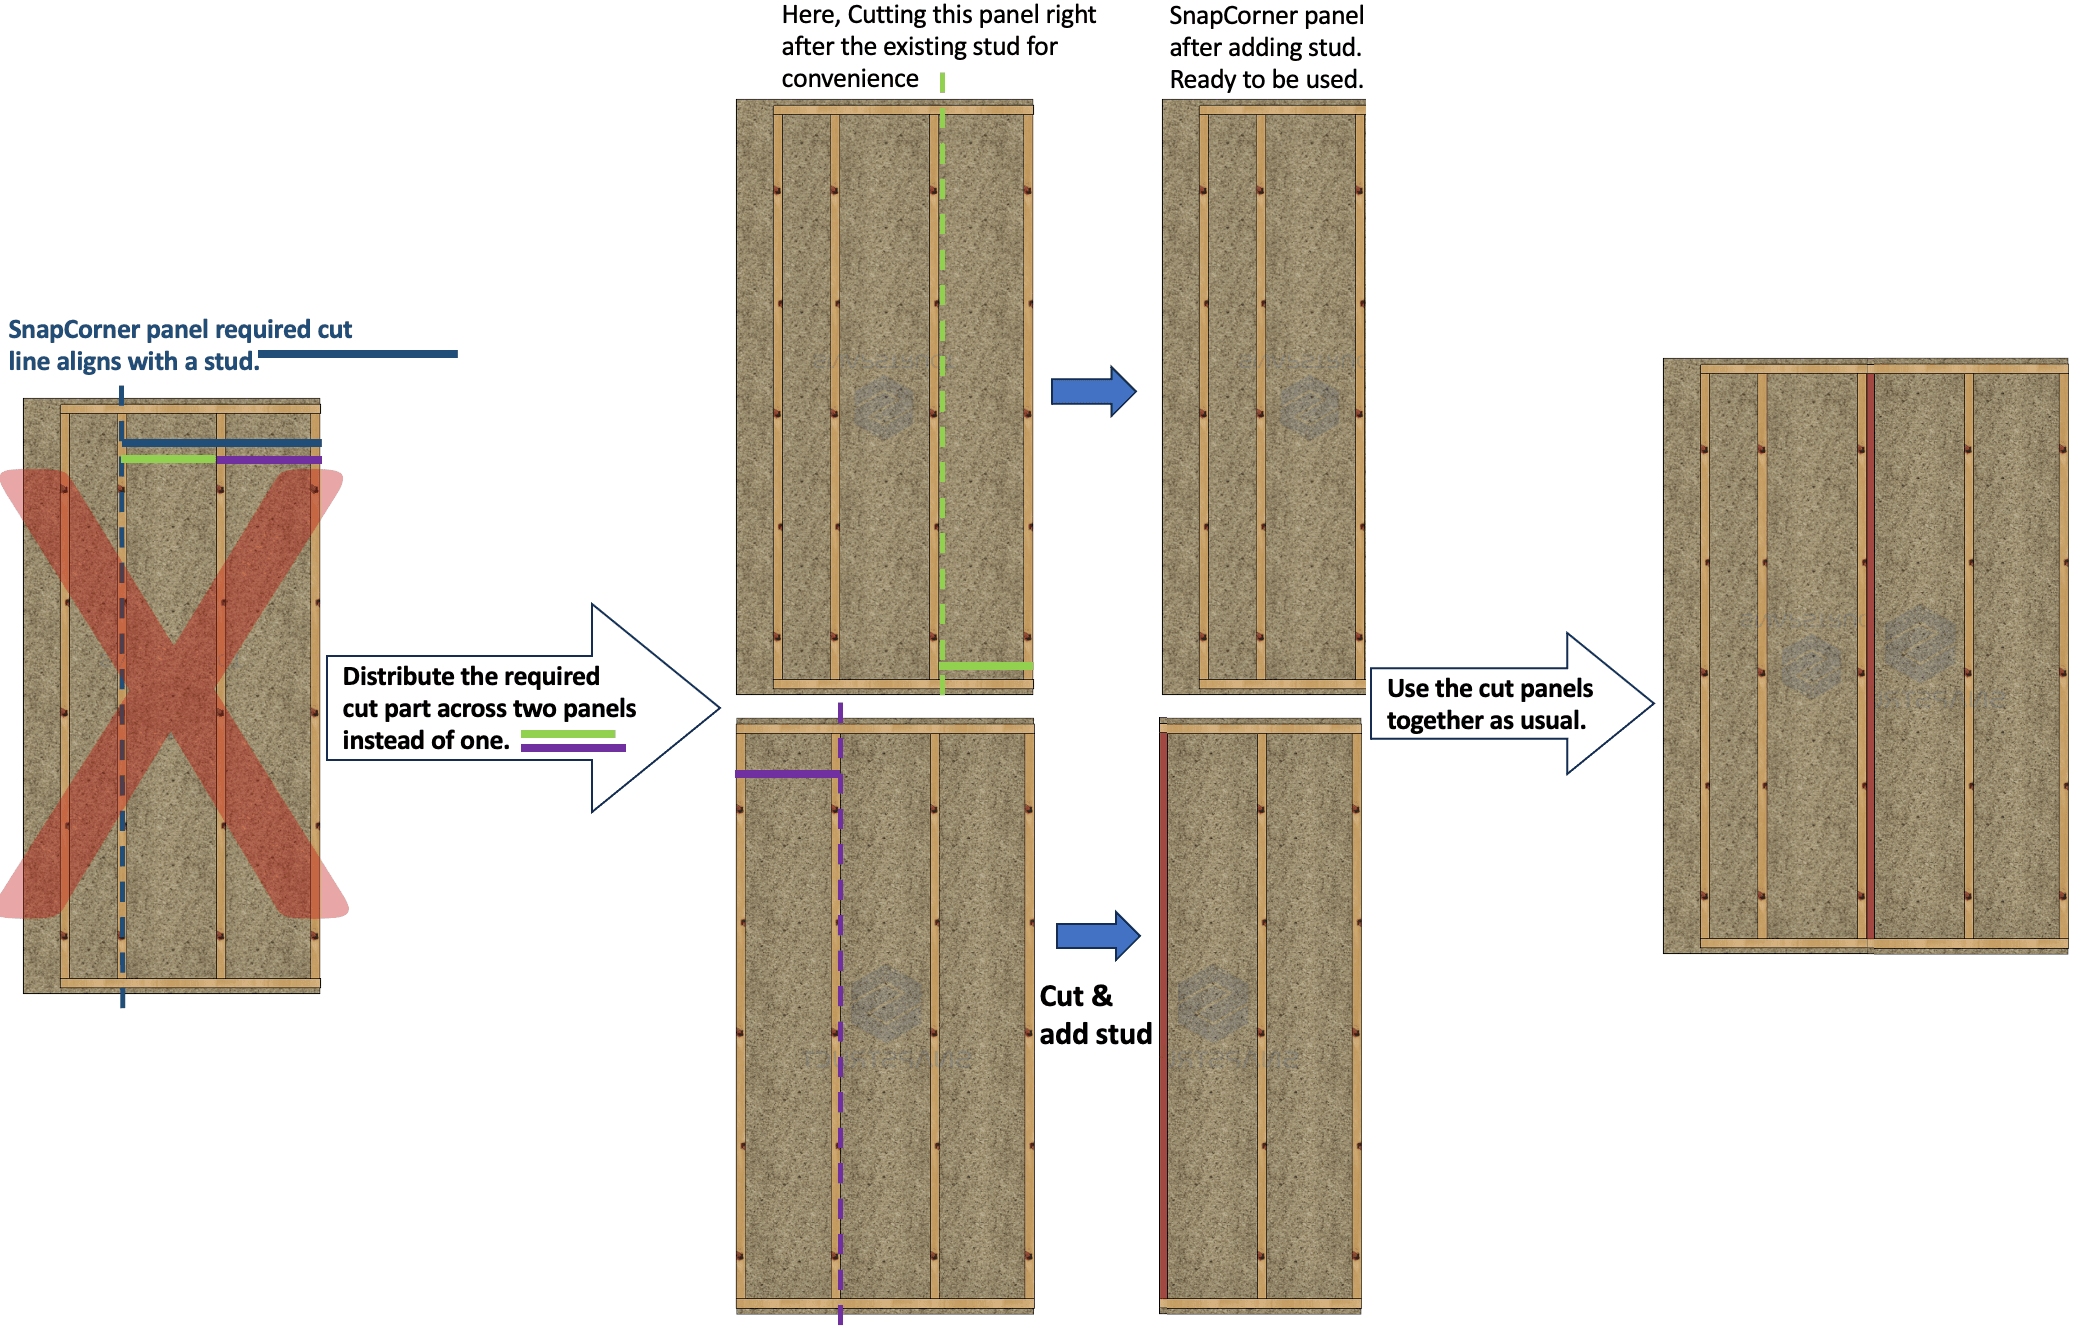
In rare cases where the cut falls within a preexisting stud in the SnapPanel, or will not allow for adding a stud to the edge of the panel after cutting. Cut two panels to achieve the required wall length (instead of cutting one panel). This way, the cut will be outside the existing studs, and you can add a stud at the edge of the cut SnapPanel, as shown in Cutting Example 2. The remaining portions can be reused elsewhere in your project or saved for future use, ensuring maximum efficiency and minimal waste.
-(Note: The added stud should extend by 1/16″ beyond the OSB edge to provide OSB expansion gap.)
- Cutting example 1: Cutting one panel. Here, we will cut one panel because the required cut does not align with an existing stud in the panel. This is the most common scenario.
- Cutting example 2: Cutting two panels. This is a less common scenario. If cutting one panel to achieve the required lengths results in the cut aligning with a pre-existing stud, we will cut two panels instead of one panel to achieve any required length, as shown below:
SnapCorner Panel
SnapCorner Panel is Designed for efficient and superior strength for corners and linking building walls. SnapCorner panels link both the top and bottom of the butt-wall and through-wall unlike traditional structures that have such link only on the top side.
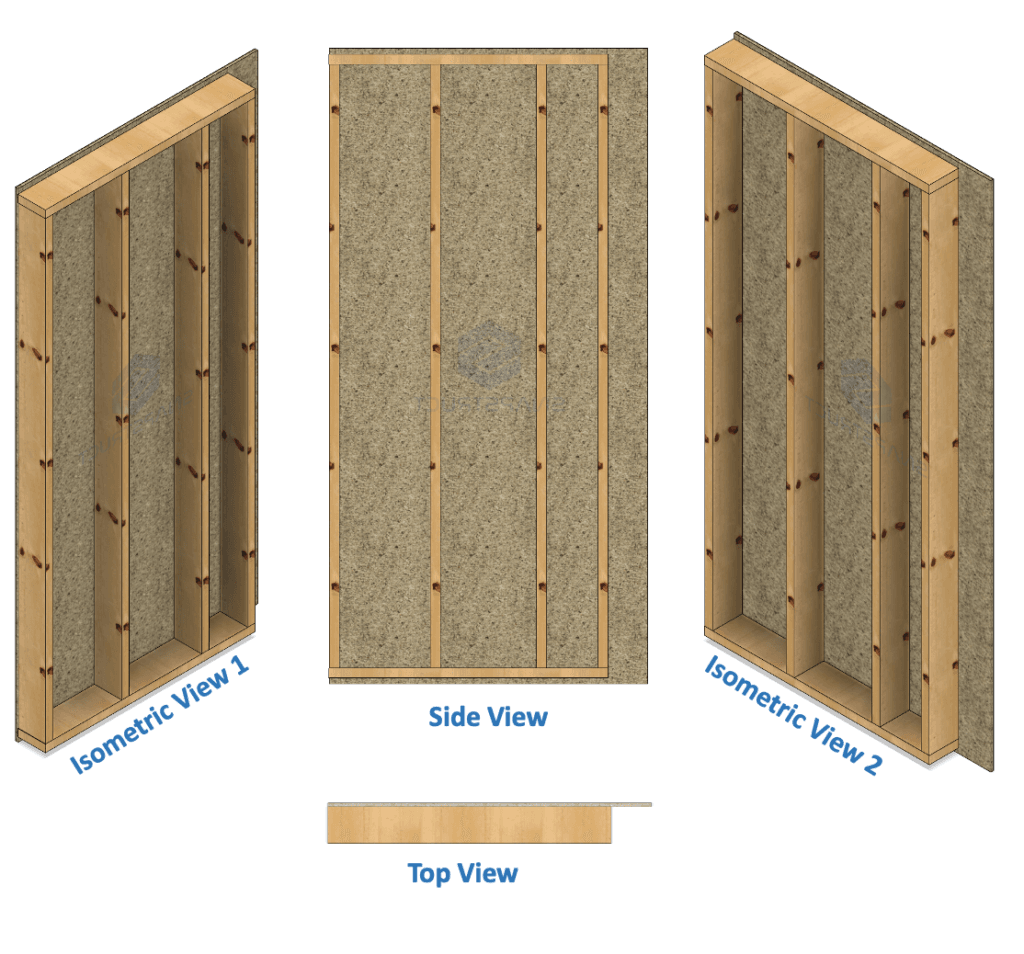
TEACH Construction Community Education explains framing corners in a great and simple way that would help you understand how to utilize SnapCorner Panels and further appreciate the superior strength SnapCorners offer.
Step 1 – Determine Butt and Through Walls.
- As a rule of thumb, the long wall is the through wall, and the shorter, intersecting wall is the butt-wall. The SnapCorner Panel is typically installed at the beginning and end of the butt-wall and can be connected to any SnapPanel or custom framing in the through-wall.

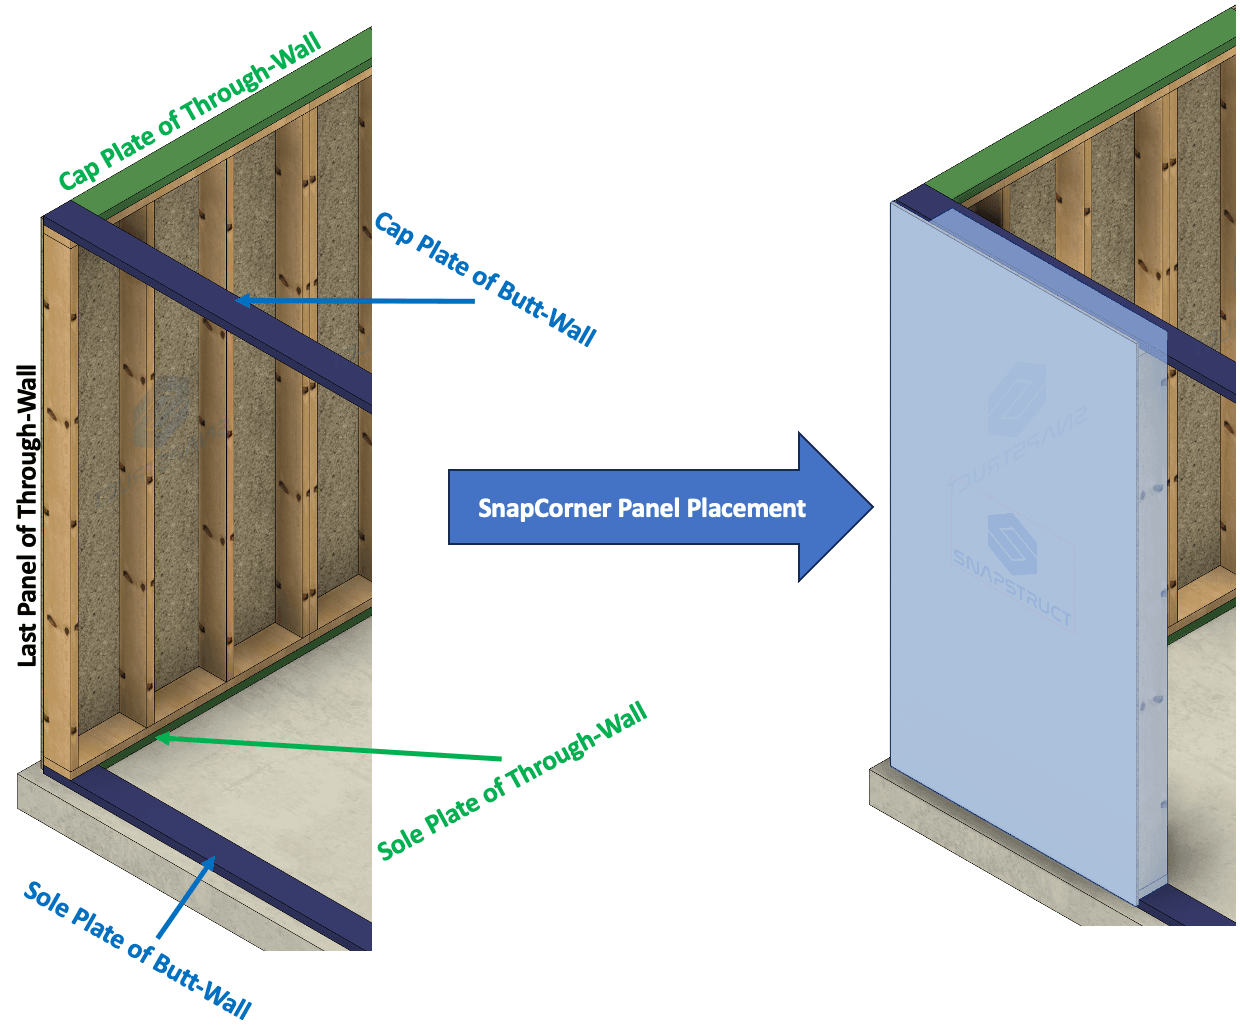
- After Identifying butt and though walls, Prepare Sole and Cap plates properly. SnapPanels system enjoys a strong double lower plates (Bottom and Sole Plates), so it is imperative to make the sole and cap plates of the butt-wall extend all the way over the through-wall to link both through-wall and butt-wall at the bottom and top as shown in the following pictures.


Step 2 – Placing SnapCorner Panel
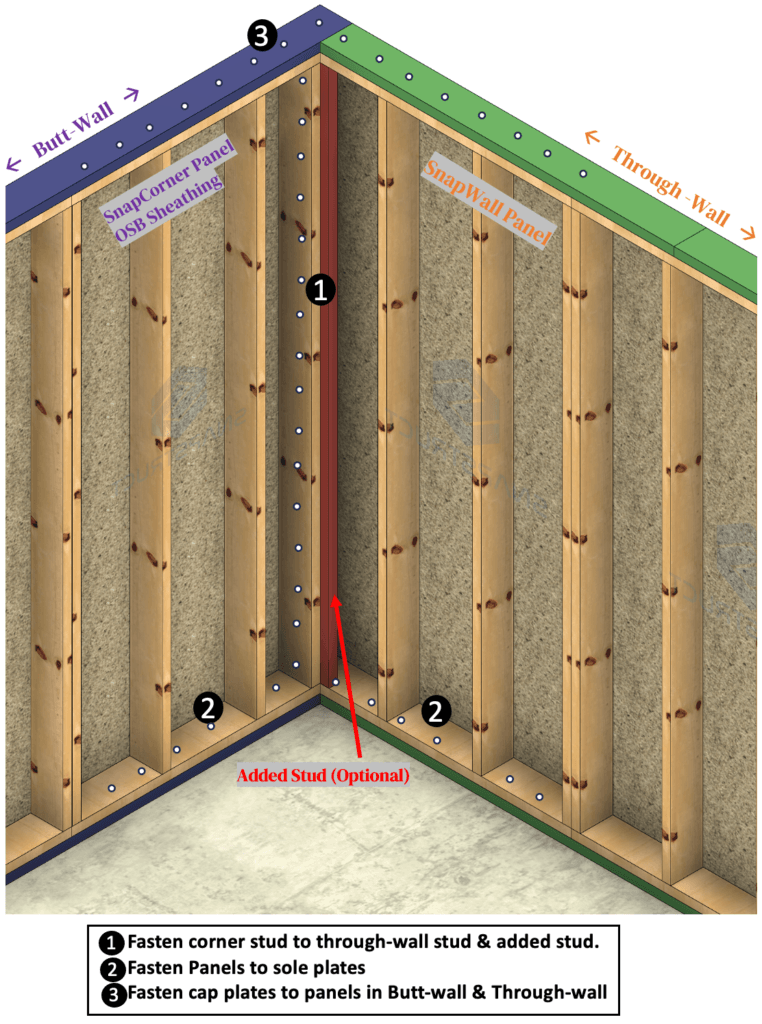
- If you plan to install drywall on the interior of your structure, it is recommended to add a stud as shown (red stud in picture), positioned perpendicular to the last stud in the through-wall. Not only does the added stud provide a stud for attaching drywall in the corner area, but it also enhances the structural integrity of the corner joint.
– The additional stud length is as follows:- 91 1/8″ for 8ft SnapPanels
- 103 1/8″ for 9ft SnapPanels
- 115 1/8″ for 10ft SnapPanels.”
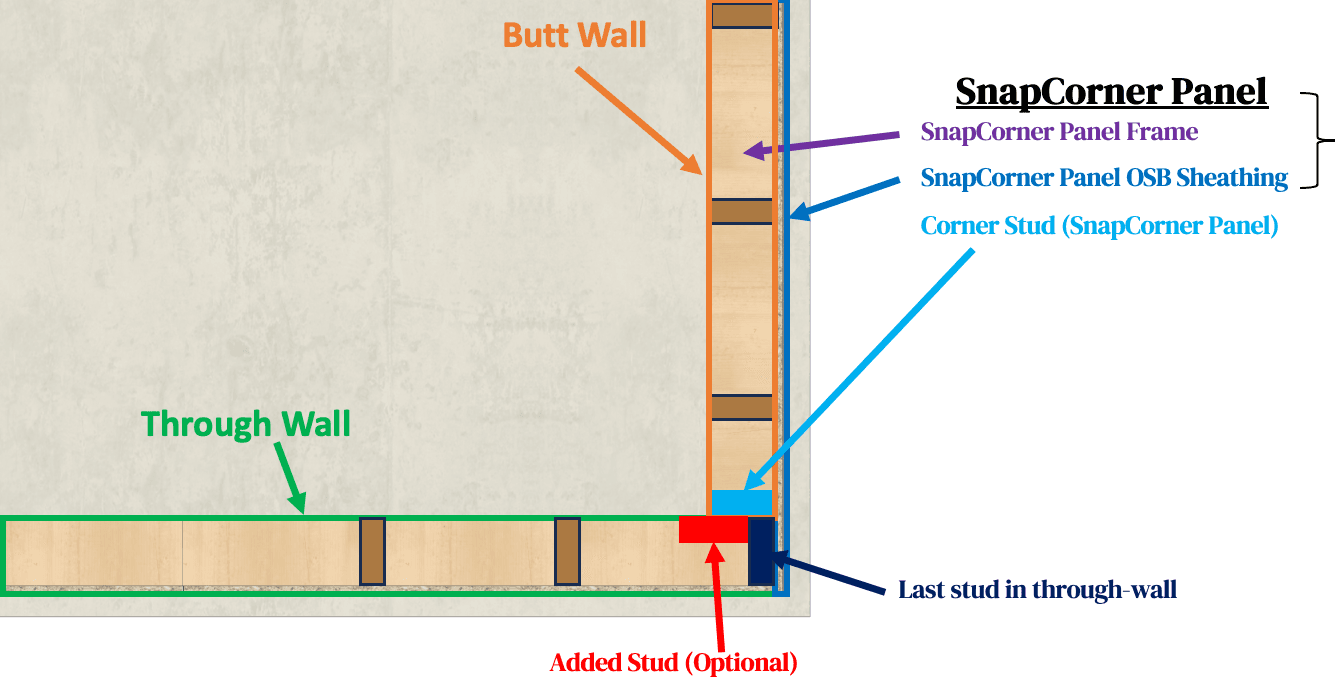
- Fasten SnapCorner Panel as follows:
- Fasten the SnapCorner panel’s corner stud to the added stud and to last stud of through-wall.
- Fasten SnapCorner panel’s bottom plate to sole plate as illustrated in Steps for all SnapPanels section.
- Nail the overhangs of the OSB Sheathing of the SnapCorner Panel to the last stud of through-wall (one nail every 6″).
SnapWindow & SnapDoor Panel:
SnapStruct offers versatile modular door and window panels in various shapes and sizes. Visit our shop page to explore available options, and if you have any questions or need a custom design, feel free to contact us!
Custom Framing Integration
- One of the standout advantages of the SnapPanels system is its remarkable flexibility, allowing you to seamlessly integrate any framing or structural designs you envision. Whether it’s a 10-foot-wide window, an angled window, a corner window, a curved section, or a customized, innovative feature wall you’ve always dreamed of—it’s all possible. Simply leave space within the frame between the SnapPanels and customize that area as you wish. SnapStruct SnapPanels are designed to save you time, reduce costs, and offer unparalleled freedom of flexibility, innovation and creativity!
- For SnapCorner panels, avoid cutting the corner joint side; you may cut the standard side instead.
